Wednesday, December 14, 2011

Christmas paper clip

Seventh day of 12 Creative Days Of Christmas 2011


On the seventh day of Christmas I made paper clips decoration...


I found these giant paper clips few weeks ago ... and I bought them immediately :) They are aproximately 4 inches long. I just love them but they was too large to fit in a mini album.And last night I just came up with another idea for Christmas project :) You can put these paper clips on Christmas presents and you can attach card with wishes.
Last night I collected anything that screamed "Christmas" in a small box and just check what worked the best...


I have more ideas how to decorate these paper clips because I have so much supplies that would go well with these idea .... I just took more natural things .... but you can use anything.
Here some close up photos:


Enjoy!!!

Tuesday, December 13, 2011

Christmas tags

Sixth day of 12 Creative Days Of Christmas 2011

On sixth day of Christmas I made 2 Christmas tags.


Here is what you need:


I put glue on the snowflakes and overlay with glitter. Then I use one of my nail brushes to sweep needless glitter.

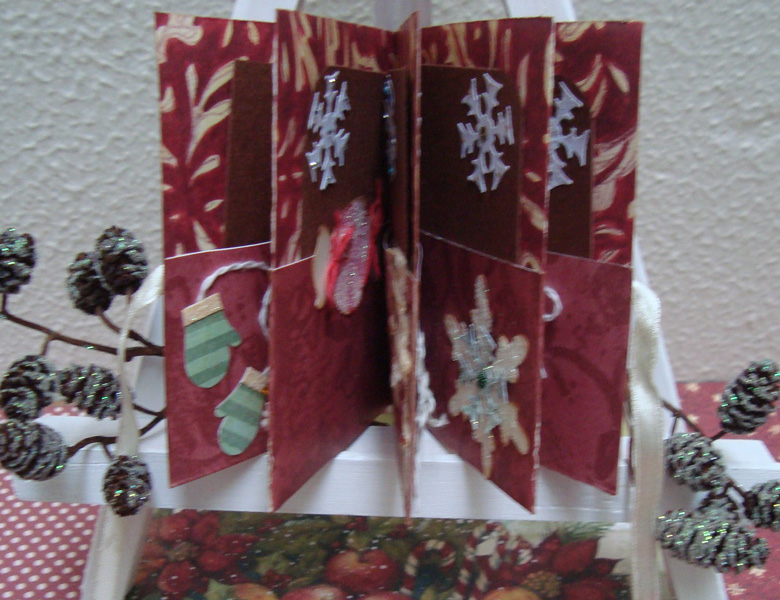
12 days of Christmas mini book

Fifth day of 12 Creative Days Of Christmas 2011


On fifth day of Christmas I made 12 days of Christmas mini book.Marion Smith showed tutorial how to made one of these and here is what I did.Here is her blog: http://www.apieceofcraft.blogspot.com/


Thursday, December 8, 2011

Christmas jar

Fourth day of 12 Creative Days Of Christmas 2011


On fourth day of Christmas I started my room decoration.


Here are my jars. I put Christmas lights inside.


Tuesday, December 6, 2011

Matchbook mini album

Third day of 12 Creative Days Of Christmas 2011

On tird day of Christmas I made a matchbook mini album. I'm very happy that finally I made one of these. This is easy and quick mini album. I used large size cello bags (12.7cm x 28.5cm) but I cut part of them because they was too long. 

Here is link to Laura Denison blog: http://followingthepapertrail.blogspot.com/2009/12/on-fourth-day-of-christmas.html
Here is link to her YouTube video:
http://www.youtube.com/watch?v=sEcVjjcUEYw


That is first page. I made small corner to embelish all pages. 


These are some tags that embelished each page.


These pretty snowflake embelished inside cover


These are few tags I put in each cello bag. I used creamy,green and brown basic cardstock and covered it with scrapbook design paper - K&Company 


On back side I make simple embelishments:


Monday, December 5, 2011

Second day of 12 Creative Days Of Christmas 2011

Here is my second project. It is mini book for Christmas wishes. It's made out of 1 sheet 12x12. You can find a lot of tutorials at YouTube how to make mini books. Embelish them as you like and write Christmas wishes. 


Sunday, December 4, 2011

12 Days of Christmas

First day of 12 Creative Days Of Christmas 2011


Welcome to the 12 Crearive Days Of Christmas 2011 projects here in my blog! I will post 12 Christmas projects until 23.12.
We finally saw snow in Ã…rhus today! Yay ... and it was gone as fast as it comes ha ha ha
That was my window few hours ago :)


This December I have 1 year anniversary in my blog! I can't believe Christmas knock on the door again ... how time flies! Previous year I didn't have time for 12 projects because I create my blog too late.
I keeped an eye on YouTube and some other blogs. And I've seen so cool Christmas projects but ... all of them needed huge amount of supplies. Then why you call it ''scrap''+book? Use your left-over papers more often! They cost money and dead tree! THINK GREEN this season!!!
So much people saw my captured fairy in a jar that I decided to made Christmas themed jar. I will post another jar project for your fireplace decoration. Anyway ... here is my first project!Enjoy!


This is a jar full of Christmas cards. I made this cards from left-over basic cardstock and design paper.
1. Overlay bottom with batting and styrofoarm pellets. They create impression that there is snow in the jar.
2. Don't put too many cards ... leave spase to put cones. They will give finished look to your jar.


And here are my cards.I made 2 types - mittens and presents. Mittens was little time consuming for because I use my own template.First cut mittens,then put extra piece on top from basic cardstock and in the end put glitter. Presents are very easy - cut squares and rectangles and tie fibers. They look like wrapped presents. You can make this cards more complicated ... that's up to you :)


Hope you like my first project.